Monday, September 9, 2013

Succulent Terrarium DIY


Happy Monday!  Hope you all had a lovely weekend.

It's been hot here, so I spent my weekend outside - we had a full beach day on Saturday, and spent yesterday picnicking and watching the America's Cup races.

In between all of that, I also worked on a small succulent terrarium...


Considering, I have the brownest of brown thumbs, I think I did ok!

I read up a bit on how to plant these out, and it turns out, it's quite simple.  You will need:
  - Assorted rocks and pebbles
  - Soil with smaller pebbles and sand mixed in
  - A planter
  - An array of succulent plants
  - A flat counter space that you don't mind getting a lot a bit dirty
 
A misconception of mine... succulents don't like water.  They are desert plants, and like to be dry.

WRONG.

No wonder I've killed so many already.

It's not that they don't like to be watered... they just don't like to sit in water... thus the pebbles, rocks, and sandy soil.  This all helps with drainage, and will be key to prevent me from killing these plants.


See the rocks down at the bottom??  I spread a solid foundation of rocks and pebbles before planting the succulents, so that when I do lightly water them, the water is able to drain to the bottom, preventing the roots from being boggy and wet.

This also will allow me to water them pretty in-frequently.  Amen to that!

Want to hear something crazy??  West Elm sells similar terrariums for $99 EACH!

This project was nowhere near that much - the glass bowl was from Ikea, ~$10.  The succulents were from Trader Joes, $2.50 each, and I bought about 5.  I've had the rocks for years, but they were from Michael's, and were about $5 for a big bag of them.  In total, this cost me, about $20.

Pretty good, right?!

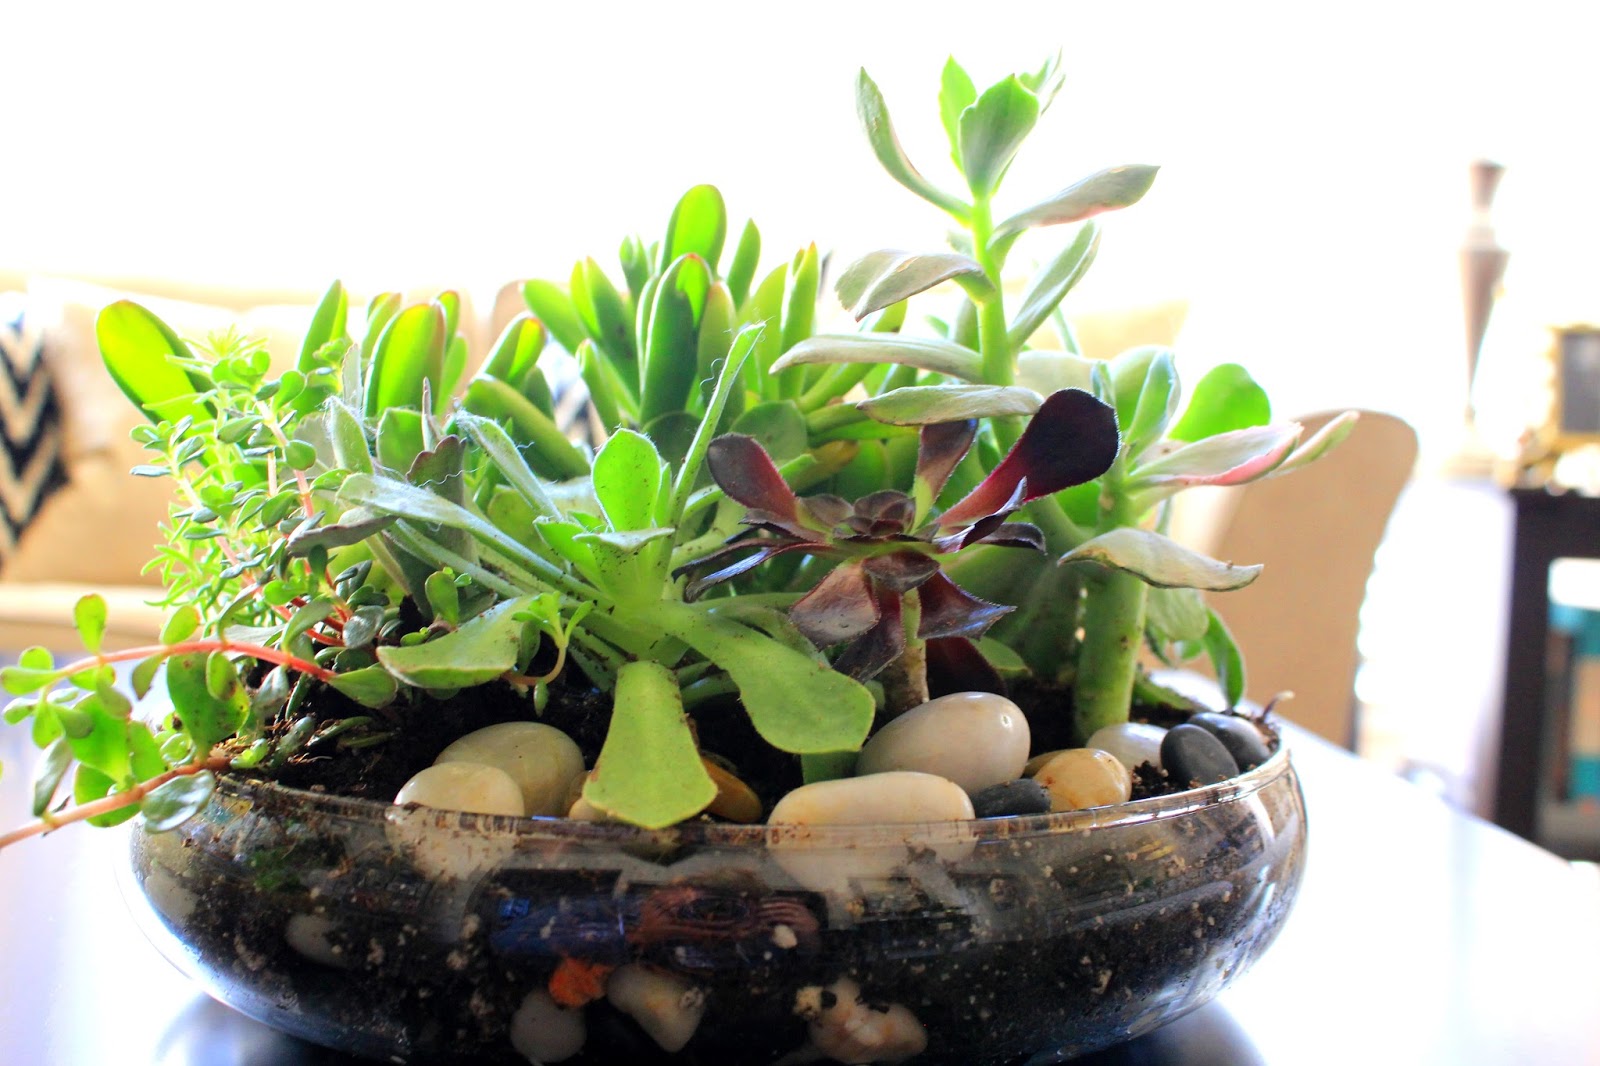
I had a lot of issues keeping the dirt off the plants when I was adding soil around them, and unfortunately for me, their waxy texture is holding onto that dirt as though it's life depended on it.  Ugh.

I tried wiping it off, using a duster... I'm hoping that over time, it will go away on it's own??


I'm pretty pleased with how it all turned out.  Look how pretty and bright green they are!!  I'm doing my best not to kill them this time, although I'm not entirely sure how long they will last.

Wish me luck!


Friday, September 6, 2013

Fall Wreath

We are having a bit of a heat spell right now - the weather has been around 85 in the city, which is rare! We've been loving every second of it, but even with the warmth, the light has somehow changed, and we're starting to feel the first few hints of fall.  The leaves on the tree's have a twinge of yellow to them, and the days are definitely shorter!


With the first inklings of fall, I decided to revamp our doorway decor - not that I'm going nuts with pumpkins in the house (too soon) but just something a bit autumnal.

I had a pine-cone wreath from last year that was very... brown.  Lots of twigs, acorns, and pine-cones... and it looked so depressing hung up, so I always took it down pretty quickly.

Well, I bought some berries and autumn leaf sprigs at Michael's (literally $5 for everything with my coupon) and busted out the glue gun.  This is the finished result...

There is still plenty of green in the leaves to keep it feeling fresh, and the color from the berries makes these pine-cones the opposite of dreary.  Lively?  Inspired? Awake (at the least!)...


A gold ribbon (mainly to hold it to the door) finishes it off...

I'm super stoked about how this turned out!  Last Christmas, I'd bought a live boxwood wreath from Trader Joe's, and it dried beautifully, so that's been hanging on our door for the last year.  The new fall wreath brings some new life to this space, and if you ask me looks awesome with the brass door knob, key hole, and numbers.


Not that I'm biased or anything, but I think it also looks fetching alongside the new gold leafed frames...


Ok, enough talk of leaves changing, and temperatures dropping... Indian Summer is here baby, and I'm heading outside to soak up the heat!

xoxo

Thursday, September 5, 2013

DIY Embellished Picture Frames


I got my inspiration for this easy DIY from Courtney over at A Thoughtful Place, but she got her inspiration for this project from House Beautiful... it all trickles down folks!


I have jumped wholeheartedly on the "gold" bandwagon, but realize that it's best used in moderation... it takes serious self restraint from taking a can of gold spray paint, gold leaf, and gold leaf pen (yes, they make a pen my friends) to everything in sight.  I'm in the process of revamping our currently gold framed gallery wall to something a bit more simple (I think)... but I digress...

Back to my little gold edged frames...


Our entryway has had an empty wall ever since I moved out the ornate Ikea mirror into our hallway... I'd been looking for a larger federal mirror, but having put myself back on a budget after a few shopping sprees, and a splurge on new bedding and the dresser DIY for our bedroom, I've decided to hold off on a pretty federal mirror for now.

The question of what to hang in this spot plagued me for a while, and then I spotted these frames in Courtney's living room, and decided to give it a go...


Super cute right??

Courtney ended up spraying tape, cutting it down to size, and then CAREFULLY wrapping it around the corners of each frame.


I took the lazy approach and taped off the corners of the frame, eyeballing about an inch and a half on each side (nope, didn't even measure), and then with a craft brush and a small pot of Martha Stewart's gold leaf paint, just dabbed each corner until it was completely covered with gorgeous texture.

Voila!!


I took the tape off the frame after the second coat went on, and the paint was still wet - it just helped get clean lines on the frame.

So... this DIY is actually just a glorified painted frame!  It was so easy - I literally finished both of these in about 10 minutes, and the paint dries fast - maybe 5 minutes until it's fully dry?


There are a few small mistakes where the paint bled under the tape, but it's fine - really from a distance, you don't notice it at all.


The entryway is really simple, but in such a small space, we figure simple is better than overdone.


Look at that crisp edge... I absolutely LOVE them!


The pretty photographs were from one of my all time favorite Etsy shops, Eye Poetry Photography.  The photographs are really dreamy and pretty, and they have a San Francisco series that I absolutely adore!


I'm not normally a HUGE fan of photographs of city landmarks (the Golden Gate Bridge or Eiffel Tower is SO overdone) but the Ferry Building is so classic, and less photographed, and I just loved the photo of the bridge at dusk - it's not the in-your-face red towers we're so used to seeing...


So that's it - the entry way got a small face-lift this week, these old frames got re-purposed, and everyone wins!

Happy Thursday!!

Wednesday, September 4, 2013

Belize Honeymoon - Fashion Inspiration

I'd mentioned that I spent the long weekend down in Orange County for a best friend's wedding, and it was incredible!  The wedding was absolutely gorgeous - from the venue to the flowers, to all the little details - it was like being in a real live Pinterest page - no joke.  My beautiful friend, Lindsay, was absolutely stunning - gorgeous, and glowing and happy.
Of course, everyone at the wedding has had to return to real life, while Lindsay and her new HUSBAND (so weird and awesome to say) are on their honeymoon in Belize. I've been daydreaming about a hot tropical vacation, and with Belize on the brain, I put together a wishlist for what I'd pack on a romantic trip down there...

I'm not known for packing light (I had a carry on AND a checked bag for 3 nights in southern California for goodness sake) but I'd do my best to limit myself to pieces that could easily transition from day to night... I'd definitely go after bright colors, and LIGHT fabrics, because it is hot and humid down there...

Here's my packing check-list...

Belize


Matthew Williamson floral dress / 120% Lino floral dress / Miss Selfridge chiffon dress / Accessorize sun dress / Jane Norman summer dress, $78 / Pull&Bear red dress, $62 / Paprika floral dress, $7.79 / Cutie summer top / One piece swimsuit / Halter top / Vix bikini / Wal G jumpsuits romper, $51 / Forever 21 romper / Charlotte Russe fringe bathing suit / Steve Madden shoes / Nine West flat sandals / MICHAEL Michael Kors tote bag / Irene Neuwirth gold jewelry / Luis Morais gold bracelet / IaM by Ileana Makri sterling silver charm / Michael Kors jewelry / Stella & Dot cuff bracelet / Blu Bijoux gold jewelry


White swimwear - you're a bride!!  And white makes you look oh so tan!  A sexy one-piece and a fringed bikini are must haves.

I'm also loving the versatility of the romper - light and easy to throw on for the beach, or for dinner with gold cuffs and cute gold sandals.  If you're feeling a bit more dressy, a pretty floaty maxi is just the thing, but it's Belize - one pair of wedges MIGHT make an appearance for a dressy night out.  With everyone else in flip-flops, it's hard to muster up the energy or desire to squeeze heels on.

A big bright tote is perfect for throwing everything into before hopping on a boat, or heading to the pool, and a selection of bright floral sundresses are essential for any beach vacation...

Tuesday, September 3, 2013

Dorm Room Rewind...

It's September, and this time of year always gets me nostalgic for back to school.  The excitement over first day of school clothes, the smell of new pencils, new notebooks, new teachers...

College...  Oh man... if I had to do it over (which I would in a heartbeat) I'd go for a totally different dorm room look.  I remember agonizing over the perfect color of periwinkle for the down comforter we were ordering, and also being really proud of the oversized cork-board covered in pictures, and a hot pink lucite lamp with matching pink shade covered in sequins.  #whatwasithinking??!!

To go back and design my dorm room, I'd go for graphic prints with a girly, youthful twist... something only an 18 year old fun loving, beach cruiser riding, UCSB co-ed could get away with...

First up... the black and white and green inspiration:

I WISH they made these storage benches when I was in college.  Not only would it have been stylish to stash our snacks, or books, or whatever it was we kept in our room, but it could have been pushed under the beds, and pulled out for seating when neighbors came by to "chill".  I love the stripes - a little Beetlejuice, but I LOVE that about it.  And the fun lime green is so youthful, and would inject some much needed life into the drab dorm room decor.

Nothing about berber carpet says, "what a comfortable, cozy living environment" - this fun rug solves that problem quickly (and cheaply!)

Next up... the girly, graphic, mint and pink combo...

Nothing says "a girl lives here" like mint and pink.  I mean, Kris would DIE if I did our bedroom up in mint bedding with some pink and zebra throw pillows.  I'd have a pretty unhappy camper on my hands.  College should be carefree, and it's the time to decorate your room the way you want... so pink and mint it is! Again, I just have to say... this storage bench is GENIUS. Oh if only we could rewind 10+ years and tell Target to make these back then...

And finally, the ultimate in girly... floral bedding!  Yes please!

I think this room is my favorite.  The floral bedding is bright and happy and fun, and the mix of patterns, and graphic is very kate spade meets a country garden.  You'll notice, I kept the accessories the same in each room - drum table (just $60 right now), and the little brass elephant from Fab is quirky and shiny, and would instantaneously make you the cool girl with great taste.  

I'm actually dying to get one of these chrome floor lamps from Ikea - a GREAT price, and aside from providing great task lighting for those late nights cramming for finals, it's ultra cool looking.  Looks REALLY pricey in person... but it's Ikea!  $70!

Done!