Showing posts with label DIY. Show all posts

Monday, December 15, 2014

Holiday Fireplace and a DIY Garland

Are you guys ready for some holiday house updates?????????


Let's dive right in!

The fireplace is the center of our living room, and an obvious focal point to decorate for the holidays.  I was so excited to be able to string up garlands, and doll it up this year since our old apartment didn't have a central focal point in the living room.  Everything was centered around our TV which was practical, but not the most attractive option.

As stoked as I was to decorate the fireplace, I REALLLLLLYYYYYYY wish that it had a mantle.  If you look closely, you'll notice that it's a flat facade, surrounded by a piece of crown molding, so there's no spot for long beautiful taper candles, leaning art, or cool decorative accents like that on top of it.

I've spent many hours scheming about how to create a mantle here, but with the fireplace being completely surrounded on all sides by a slab of mirror, it just won't work... unless I dare risk 7 years bad luck by breaking it... which I'm not down for. Sometimes we just have to make do with what we've got.... right??  Kind of the story of my life, but let's be honest - I'm just happy to have a fireplace to decorate this year!

When I lived here before, I always loved how we strung a pre-lighted garland across the fireplace, but after digging that garland out of storage it was looking pretty sad.  It was all smushed, and had little (if any) resemblance to real greenery.  Imagine something like this... but faded, and flattened after being stored in a box for several years....

It was time to find a new game plan for our mantle - I loved the idea of a garland, but wanted it to be super full, and really eye-catching.  And what would be more eye-catching than a bunch of gold ornaments strung together and wound up with fairy lights and greenery??  This garland DIY is super easy to pull together, so for anyone looking for a fun holiday project, this is the one for you!  In fact, the more wine you drink while working on it, the better.

May I present to you our Gold and Green(ery) Garland.  It's two separate garlands woven together to make one massive, awesome, holiday focal point.  It's sparkly - especially once the garland is plugged in at night - and a little over the top but I'm totally in love with it.

The ornament garland was a DIY project I worked on one afternoon while catching up on bad reality TV.  Nothing to get you in the holiday spirit than watching the Kardashian's bicker.


I actually tested it out last year on a smaller garland that we now have hanging in the kitchen (yep, even the kitchen got a little holiday love in 2014), and making it is soooo easy.  Look back at this post for the original instructions, but there isn't much to explain.  

Basically you need to start with a TON of ornaments - do not use glass.  They WILL shatter.  I used 4 boxes of plastic balls in assorted gold tones from Ikea... LOVE the Ikea holiday section this year.  They win the award for "best everything".  More on them later... back to the DIY.

Start with tons of balls {insert joke here}.

Get your hands on a long strand of thick wire.  Ribbon might work but I like that the wire forms to the shape you want.

Sting balls onto wire while accidentally drinking the better part of a bottle of wine and watching trashy TV.

Here's what you'll end up with:


Super technical DIY project *wink wink*

Once I had all the ornaments strung on the wire, it was time to hunt down a pretty green garland to replace our sad looking one.

I wanted one that was hefty, and that looked natural (at least somewhat).  I looked into ordering a fresh garland for about two-seconds until realizing fresh garlands in SF ran about $160.  Um, no thanks.  

Off to Michael's I went (with my coupon of course) and scored this beauty for something like $25.  I think without the 40% off coupon it was in the high $30 range.  Still, not bad for a lighted green 9' garland with pine cones interspersed and several types of faux greens in the mix.

Once I got the green garland home, I wound the two garlands around one another, and secured them to the wood molding around the fireplace with two small nails, and more of the wire that I'd used to string the ornaments.

The nails will leave the smallest of holes, and will be easy to conceal with wood putty, and a coat of white paint.


Another new addition to our holiday fireplace, is this starburst mirror.


I love a good starburst - we have one hanging over our bed as well - but this is one of the best finds of my shopping career... EVER.

Such a score!

I consider myself to be a pretty serious bargain hunter - not on the same level as those crazy extreme couponers, but I take the sale sections seriously.  As I was at the Home Depot over the weekend, wandering the aisles in search of a ceiling medallion (another story for another day), I found myself in the aisle with decorative moldings, hollow core doors, and what else... mirrors!

Easily distracted, I ventured over to the mirrors, and there, hanging on the wall was a mirror very similar to this one that I've been trying to hunt down!!  It was a bit smaller than I'd wanted, but I was intrigued.  I picked up the box below the sample mirror, and guess what?  It a box for a completely different mirror.  A sunburst mirror.

A sunburst mirror that was marked down to $6.

SIX DOLLARS.

I cannot make this stuff up.

I grabbed that box so fast, and was out of there before anyone could fight me for my $6 mirror.


Not only was it SIX DOLLARS (which I still cannot wrap my mind around), but it was bigger than the octagonal mirror I was originally admiring, and it fills out this space above the fireplace so well.

Here she is close-up - isn't she pretty??
 

I also love that the center of the sunburst is convex, so it sort of distorts the reflection.  Very cool.


It was a Christmas miracle actually.  I've been agonizing over what to hang here for a while.  The empty expanse of mirrors above and on the sides of the fireplace felt really 80's to me.  

On the one hand, all these mirrors make the room feel larger, but with no mantle above the fireplace to lean art on, place picture frames, flowers, branches... basically anything to draw the eye up, and compliment the spot above the fireplace, it was just so empty.  It needed something.

I toyed with the idea of trying to hang a large piece of art here, but wasn't loving that idea.  Every time I had Kris hold something up there it just felt odd.  I also toyed with the idea of hanging a mirror over here, but never found the right thing 


I am so thrilled with how this looks but I'm not completely sold on the ribbon that secures it to a nail above the mirror.  For now, with the holidays, it's fine, but I'm not sure if the ribbon will stay - perhaps a string of clear fishing wire or something similar would be best, so it looks more like it's mounted to the mirror, and less like it's dangling from above.

Surprisingly enough, Kris is on board with the ribbon, so if we do keep it, I won't have to worry about his complaints.

Also in the living room are several wrapped presents - I like to get them wrapped and under the tree as early as possible since they just add to the festive feel.  I'm liking the simple feel of this brown paper, and bold ribbon, and a sprig of douglas fir finishes it off so nicely!  And guess what... the branches were free! I may or may not have been scavenging the discard bins at the Christmas Tree Tent at Home Depot, but it's fair game!  The guys working the saws at the tree lot confirmed that these branches that get stripped from the bottoms of the trees are headed to the chipper at the end of the day, so I see it more as rescuing them.


And how awesome is that red cardinal ribbon??  Michaels was having 60% off their ribbon over the weekend, so 25 yards of this stuff was $3.  Yes please!!  Red cardinals and festive tartan ribbon for everyone!!!


I've been spoiling myself this year with fresh flowers only in the house, and have found that I can make hydrangeas last for a solid month, if I take care of them JUST right.  I made this arrangement feel a bit more holiday-like with the addition of woodsy greenery, and some cool burgundy branches.

Apparently hydrangeas like HOT water, with a little bleach.  Cut the stems vertically so they can soak up as much water through their woody stem, and they are good to go. I learned this little trick from an episode of the Barefoot Contessa, and I never forgot it!  Just change the water out once a week, they tend to last and last and last.  

I think my record was 7 weeks of keeping a cut hydrangea alive. #impressive


So that's our holiday mantle fireplace!  More festive updates coming your way soon, but the whole house got decked out - there's a tree, an inappropriate Santa, and a really festive dining room still to share!

Monday, October 13, 2014

A Revamped Office Plan

Hola friends!!  How's everything going for you this week??

Just wanted to check in since some ideas have been spinning around in my head.  We're re-working our office space at home as we speak, and I'm really excited about the inexpensive changes we're making.  


I'd been pretty happy with the mini makeover we'd given this space a few months back... the office had been functioning fine for me when I'd work from home, but as I think it goes with most projects around the house, it always starts with one little thing.... our thing was a computer monitor.

Kris has been working from home, and really needed a computer monitor to be more productive.  We talked about it, and agreed that if he needed one to be more productive when working at home, it was a good decision.  So he went ahead to choose which one he wanted and ordered it.

Fast forward a few weeks, and there was a massive box sitting in the entryway.  What was in this massive box, I thought?  Turns out, the massive box held an equally massive computer monitor... like big-screen TV massive.  Why am I not surprised.... men!

What this meant was that we now needed a new desk.  The desk we already had was WAY TOO SMALL to house his behemoth computer monitor, laptop, and various other desk stuffs, and so the hunt for a new desk, and the mission to revamp our office was born.

To refresh your memory, here's how the room had been looking........


All the updates we'd made in this space were really inexpensive.  I sanded and painted an old desk that was literally falling apart, painted the walls, and hung a drum shade for overhead light.  Since this photo was taken, I've also painted the grout white, and brought in some life in the form of an enormous, gorgeous plant.  

I swear people, plants make everything better.

All the updates we already made were extremely friendly on the wallet, and surprise surprise, we plan to keep the second phase of this room's makeover equally inexpensive.  Since we will be replacing the above desk with one almost twice it's size, we'll also be changing the layout of the room.  The desk will live on the right hand wall perpendicular to where it is in the above picture.

I also want to clean up those curtains.  They are too sheer, so I'd love to line them, and they are also way too long, so they need to be hemmed.  I got lazy when I worked on them the first time, so even though they needed to be hemmed months ago, I just rolled them under and called it a day.  Shameful!  Having them hemmed with a crisp edge will make them SO much better.

We're also going to have one big empty wall to fill up, so there will be a project there as well... maybe a nice shelf above the monitor to have some pretty frames lined up... or a gallery wall around the monitor could be nice... not sure yet!

A few more things... we need a desk chair that is as comfortable as it is beautiful, and a comfy spot to perch in the window since that space will be freed up.  Can't you just imagine me cozied up in the sunshine on a winter afternoon??

In terms of a desk, here's what we're thinking.......


Kris likes modern, I like a warmer look, and this sort of combines the best for both worlds.  Kris likes the clean silhouette, and I like the warm wood top. Done!

We started out looking at desks from West Elm, World Market, Target, and everywhere in between since this was not a project we wanted to put a ton of cash into, but even options from there were adding up to several hundred dollars.  Our solution is going to cost us less than $100, and I can't wait to share more details once it all comes together! 

More updates soon, promise!

xoxo

Wednesday, August 6, 2014

DIY Art - Gold Arrow Copy Cat


Hey friends!!  Happy Wednesday :-)

Not sure if you remember, but a while back I'd posted about DIY art.  It all started with the inspiration photo above from House Tweaking.  Her post is great, but the comments... yowzers!!  Apparently people had some harsh opinions about her having painted over one UGLY piece of art that she didn't love.  I myself could not care less - especially since I LOVED how the arrow art came out.  Clearly.

Loved it so much in fact that I recreated it for our own house!

May I present to you, my own version of the inverted arrow art...


It's not the easiest to photograph, especially when it's hanging on a wall in a room that is currently being used as a catch all storage area for things like empty boxes, a loveseat that we just sold, and wood.  Lots and lots of wood that will soon become a planter for our deck.

I pushed some of the junk out of the way in an attempt to stage some pretty things around the art, and it was not my best effort... for sure... but you can totally see the paintings scale here.  Its quite large.


The canvas I used was actually re-purposed - my best friend left an old black and white stretched canvas print from Ikea when she moved across the country, and it made the perfect piece for me to experiment on. No one was going to miss that print.

So I painted over it.

Two coats of white got rolled on and after it dried, I went to work taping off my arrows.  I did some vague measurements, since eyeballing the middle of a 40" canvas is not as easy as you'd think, and taped the arrows out.

I got a mix of gold paints - including a bronze, and two different shades of gold from the Martha Stewart line. Not to diss Martha, but I was not impressed.  All the metallic shades were flat (not metallic really at all) and the gold looked mustard-y to me.

Back to Michael's I went in search of the magical Liquid Leaf.  It's nice and shiny, and I've used it on projects before so I knew it would work well.


You can see close up that I painted it on thicker in some areas for more dimension - sort of a 3-D gold effect, and it looks really pretty in different lights.

The gold leaf paint dries in minutes, so I peeled the tape off as soon as I finished, and that was that. Insta-art!


I'm certainly no artist, but it was fun to play the part one foggy afternoon a few weeks ago.  

And better yet, we now have a virtually free piece of art that is a nice focal point in our junk room office.

And even better still, we didn't have to throw out a perfectly good canvas even though we didn't like the art, so I like to think we're also saving the environment... even just a little...


So easy!  Happy Wednesday friends!

Friday, July 25, 2014

Kitchen Inspiration for Phase II Updates

Hello friends!!

Thanks for all the kind words on our little kitchen facelift that I'd posted about earlier in the week!

So far, the grout paint is holding up really well!  We've had it for about a month now, and so far so good - we cook / clean a lot, so we're not being gentle on these counter-tops by any means.  I'll keep you posted though on how it wears long term.

In my last post, I'd mentioned that this was "Phase I" of the kitchen update... part of me is still debating if we need a Phase II, but here's a little hint about what I've been dabbling with for a potential Phase II...


Don't you just love???

Obviously these kitchens are all so lovely, and I would just be making superficial updates to our dated kitchen from the '80's (we rent!) but there is a lot we could do to doll it up a bit...

I adore the look of dark lowers and light upper cabinets - it's like a tuxedo... but not.

The reason I've been toying with this is that our kitchen is feeling really "white" - this isn't a bad thing considering before the few updates I've made, it was feeling really "yellow", but with the white tile counters, the white cabinets, the white appliances and the white floor, I think dark lower cabinets would look really nice.

This is what things are looking like now:


Don't get me wrong, I think this is a great place to be considering where we started, but don't you think dark grey lower cabinets would look really good???

There are other things I want to work on before painting these lowers - like painting the bathroom which will be super challenging to cut in around the sink, the multiple windows and doors, and get in behind the toilet - but it's a thought.

Another idea I've been dabbling with for the kitchen... more grout paint... but this time on the floor.  Same situation - white tile (it's linoleum, but is made to look like marble) but with that hideous dark grout!  We have two large jute area rugs to mask all those gridlines (it makes you dizzy!) but I'd love for the floor grout to be white too.  If I am crazy enough to attempt this, then the kitchen really will be white on white on white, with more white, so the lowers will almost NEED to be painted.

Right??

Am I crazy to be thinking about this?  Possibly... but I somehow can't stop thinking about it!

Ok, so this is admittedly not my finest attempt at rendering something, but what do you think...


I'm thinking... me likey....

Tuesday, July 22, 2014

Kitchen Counter Makeover - Painted Grout

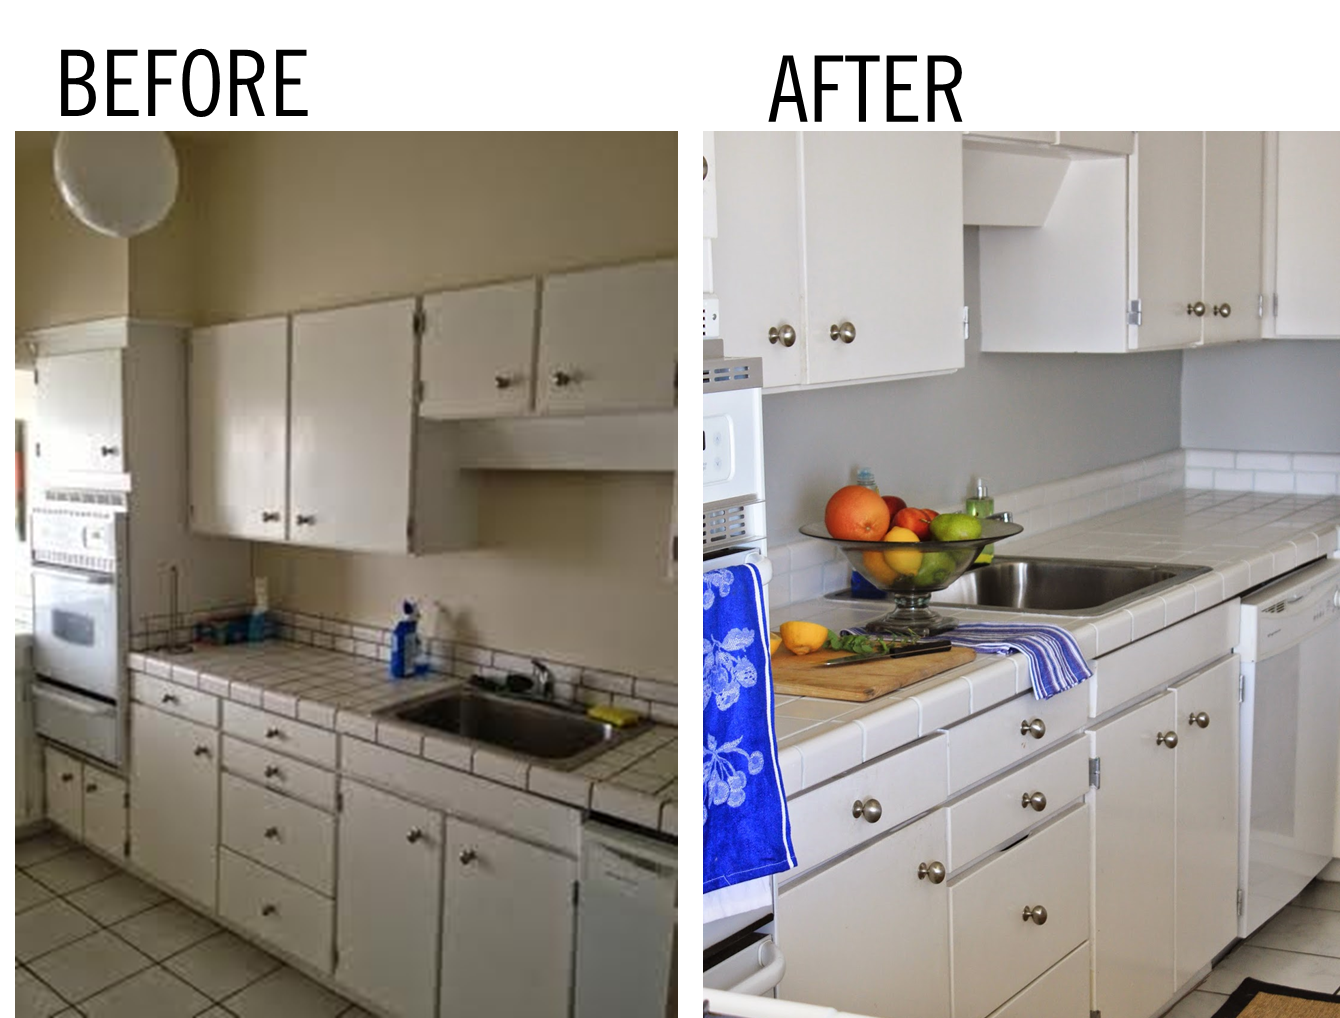
So our kitchen got a bit of a makeover recently!!  Actually, "a bit of a makeover" is an understatement.  The tile counter-tops got a total face-lift thanks to some industrial strength grout paint.  This whole space is feeling dramatically different than it did when we moved in and I hardly spent a dime doing the updates.

I finally got around to snapping some pictures of all the progress I've made on our kitchen today, and cannot wait to share the before and after's with you!  I'm calling this "Phase I" of our kitchen's makeover, and it's quite a dramatic transformation.  

Here is what the kitchen looks like as of this afternoon:


Trust me when I say that this is a dramatic improvement from where we started!

It now feels bright and clean, and so much newer and modern than it did just a few weeks ago.  All I did was paint.  Paint on the walls, and paint on the grout.  Sounds weird, but grout paint is a thing.  I used a different brand for our shower a few months back, and while I was happy with those results at the time, I had no idea that there were better products out there.

After doing some research I discovered a product called Polyblend Grout Renew.  


I'm telling you, this stuff is life changing.  It has AMAZING reviews online, and two of my favorite bloggers from Young House Love, used it on the tile entryway of their new home.  Apparently its holding up to foot traffic, so I knew I had a good shot using it on our counters.  This particular brand of grout paint has a sealer built into it, so I wasn't as worried about doing a light color on the grout as I would have been otherwise.

Ok, so before I get into the process of how to apply the paint, and revamp old, disgusting grout to your heart's content, let's see a few "before" pics... shall we?

So this is what the kitchen counters looked like when we started the process...


Woof.


They were bad my friends.  Like so bad, these pictures don't really do their grossness justice.

As you can see, the off-white tile had dark brown grout.  Not an attractive combination.

The walls and back-splash were all yellowed out paint that only made said grout / tile look even worse. Everything about the combination of the paint and dark grout made the kitchen feel dirty and dated - very 80's, and not in a cute Cindy-Lauper-teased-hair-Breakfast-Club kind of way.

Before you can start painting the grout, first you have to clean it, and I'm not talking about wiping it down with a Clorox Disinfecting Wipe.  You need to get Sulfamic Acid Cleaner.  What is this, you ask? It's a very smelly, apparently toxic, cleaning agent that will lift YEARS of grime from your grout.  I found this out first hand.

As a heads up, this is not a job you can knock out in one night - the cleaning took me several hours at least, and then you have to let the grout dry really well before painting, or the grout paint won't adhere.

Let's start by talking about the cleaning process... The container had good instructions on how to mix it up, but not much about what to do after, and I wasn't able to find much online, so here's what worked for me:

Wear gloves - don't try to do this without them. I also wore safety goggles because this stuff seemed pretty toxic and I value my vision.  Once you're all suited up, get your grout wet with water so it will absorb the cleaner evenly.  Then mix the Sulfamic Acid per the instructions on the container, and apply to counters with a sponge you will never use again.  After applying it to the counters, everything happens pretty quickly.  After a few minutes you'll notice things getting a little gummy.  That's grease.  And grime.  And unidentifable grossness that has built up over time.  This is supposed to happen. Let it.  Once it's really gumming up, start scrubbing.  I used a plastic bristle brush and it worked beautifully.  Once the gummyness comes up, rinse with clean water.  It's going to take a lot of water, and much more scrubbing, because the grease smears around.  It doesn't just lift off like you think it will.  It's all super fun (insert sarcasm here) but once its clean, you'll notice a difference. A HUGE difference. Your grout will literally be restored to its original color.  Prepare yourself to be shocked.  I thought the grout in here was dark brown.  It was actually light brown - equally unattractive, and really really gross to think about.

Anyway, once the grout is clean, let it dry out - overnight at least - and then get to painting.  Super simple.  I used a stiff bristle toothbrush, and you just work the paint into the grout.  It will get on the tile.  You have two options - wipe it immediately, or let it dry and remove it later.

I started out doing option 1, and it was tedious.  Especially since covering brown grout with white paint required two coats for full coverage (3 coats in some places).  I found that it was easy enough to get off the tile after it was all dried.  I actually let it cure for a few days, then got the counters wet, and the paint on the tiles literally rubbed off with a finger / paper towel.  Soooo much easier than wiping as you go, but do what feels right.

Anyhoo, that's the whole process!  I'm not going to lie, it was a bit back-breaking to lean over the counters, but I put on some good music, and spaced out.  It's pretty mindless and easy except for the leaning over part, but it was 100% worth the outcome! Our kitchen feels brand new to me and so much fresher.  In total, it took me about 3 nights to finish - one night to clean, one night to paint, and one night to clean the paint off the tiles where it went out of bounds.

Here are some more pictures of our kitchen counters after their facelift:


Love!!  It's LOVE!!  After the counters were looking all clean and new, I decided the walls and back-splash needed some love too. Out came the paint, and a few hours later I was in a bright, clean grey and white haven.

The Polyblend Grout Renew Grout Paint comes in a bunch of different colors (and multiple shades of white), so I bought two and tested them out.  I brought home the Antique White and the Snow White colors, because I didnt want the end result to look too white next to our off-white tile.  The tiles started out looking really beige but it turned out that they were much more white than I originally thought.  After testing both colors of grout paint, I ended up going with the Snow White (which is the whiter one).

As you can see, it's not jarring, and it looks really natural.  In the end, our tile is actually pretty white, and it was just the yellowing walls and disgusting brown grout that made them look so beige.  Who knew?!

Anyway, do you want to see a series of before and afters side by side to compare??

That's the best part of these posts...

Here we go!


And just becuase I knew you wouldn't be able to get enough of how fresh and lovely our kitchen is looking, I snapped a few more pics "just because"...

Here's how clean and pretty our sink is looking now...


Like a breath of fresh air I tell you!!  I actually enjoy cooking in here now!!


 And here we are looking back the other direction from the sink... nothing but clean countertops, all the way down!!


 These next two photographs were taken standing behind the stove (in my little desk / office area that I'd posted about here) looking back towards the dishwasher...


And, that's the update!  What do you think?

It's unfortunately not quite as dramatic in pictures as it is in person, but trust me when I say that a coat of paint on the walls, and grout paint on the counters have transformed this room from a gloomy, dated, grease-fest, to a bright, airy, food sanctuary.

It's night and day my friends.