Friday, May 31, 2013

Making an Old Apartment New

It's pretty much official that my best friend, Kira, is moving to Chicago, which means that Kris and I will be most likely packing up our little apartment, and moving back into the apartment I shared with Kira.  It's bigger, and packs a lot of character, so it's pretty much a no brainer.  Putting aside the fact that I'll miss her so much, I really am looking forward to living there again.  

It gets great light all day with a east/west exposure (our current apartment is north/south facing), has tall ceilings  an a open layout.  We'll have space for an office AND dining room (separately), a deck for grilling, a backyard, and a much larger kitchen.

View of the bay from Pac Heights, San Francisco: Source

Obviously it has it's downsides - a terrible shower, a teeny tiny oven that doesn't fit a standard cookie sheet, and a leaky roof - but these are all things we can work around.  Before Kris and I moved in together, I lived with Kira there for just over two years, which means this place has been inhabited without updates for nearly 4 years.  While it's in good shape, things start looking a little sad over time, so we'll definitely need to make some improvements.

While I don't want to put any serious money into renovations (all appliances will stay as is) I don't mind spending a little money (and a lot of elbow grease) to spruce things up.  

One of the rooms that needs some serious love is the kitchen.  I've been keeping a running mental list of what I'd like to update, and while there is a multitude of sins that paint can cover up, I'm looking forward to getting a little creative.  I also want to be extremely conscious of the fact that whatever we do has to be seen by the landlord as an "improvement" so no jarring changes that they wouldn't want to keep for a future tenant.

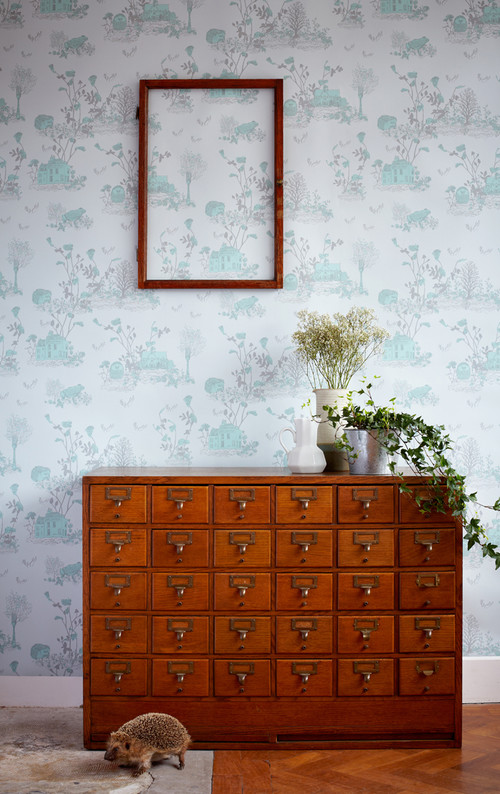
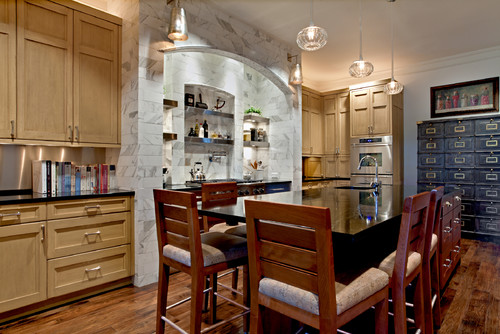
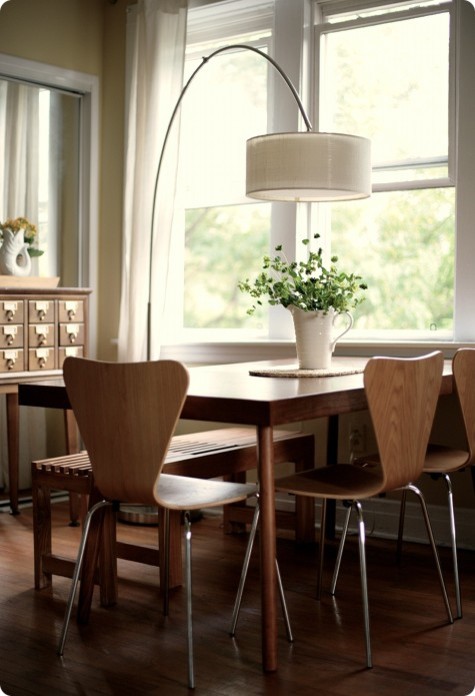
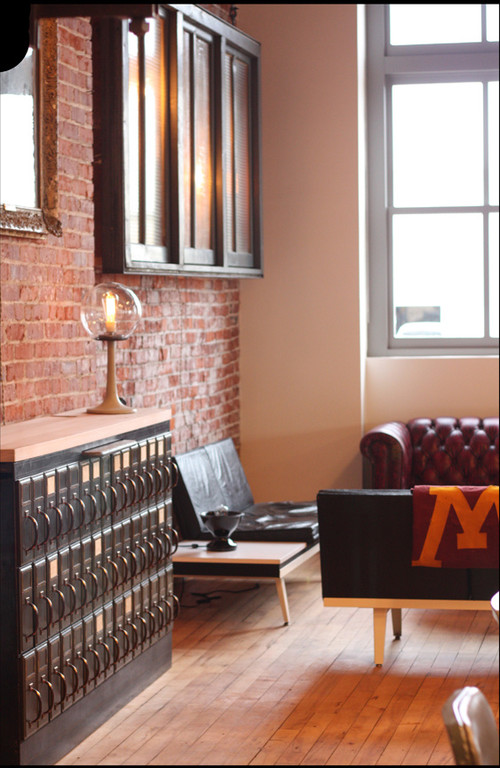
The kitchen cabinets are nothing to write home about, and they could use some serious love - I'm thinking they'd benefit a great deal from being sanded down, and re-painted a soft grey...

Here are a few photo's I'm using for inspiration...


I love the look of the brass pulls in most of these photos, but right now, the cabinets and drawers have cheap silver pulls.  Hardware adds up really fast, and with possibly 15-20 pulls, new cabinet hardware could get really pricey.  I may just leave them as is, but there is also the option of using spray paint on them, and even replacing a few pulls on a few of the drawers / cabinets are are most focal.

Just some food for thought...

Connected to the kitchen is a large breakfast room - I think we'll use this as an office, but as it's essentially part of the kitchen, I want it to have a cohesive look and feel.  We painted two of the walls a muted sage green a few years back, but I'm thinking it's time for that to go, and switch back to something lighter and brighter since this room has tons of windows.

I've actually been loving the look of a striped focal wall, and something like this could be kind of cool...
 
Since the cabinets don't meet the ceiling, and I'm thinking of a medium grey on the cabinets, perhaps a very pale grey would look nice bringing the cabinets to the ceiling... or should we do the stripes on the wall the same color as the cabinets...

More food for thought...

I also really love the casual, fun vibe of a chalkboard wall.  On the wall opposite the sink, stove, and cabinets, I'd love to paint a large chalkboard directly on the wall, and possibly frame it like one of these...


Do they make magnetic chalkboard paint?  It could be kind of fun if it were, so we could use this as a sort of command center.

Anyways, that was sort of rambling post, but sometimes it helps to get ideas down on paper.

Opinions?  Any other simple, but cool things you've seen in kitchens lately I should be thinking about??

Thursday, May 30, 2013

Re-purposing a Card Catalog

The public library is no longer the only place for the card catalog as is evidenced by the many MANY stylish spaces that use these pieces.

I feel that the apothecary table (made popular by Pottery Barn, and then made REALLY popular by that episode of Friends) was the beginning of making these types of pieces with many little drawers popular for home decor.  If you don't get my reference to Friends, you HAVE to watch this clip...

While the card catalog isn't super functional for someone looking for serious storage (let's be honest, you aren't going to store linens, plates, or anything much larger than an index card in these bad boys) they bring a lot of character to a space, and for smaller things (art supplies, kitchen utensils, crafting materials, etc) they could prove as functional as they are lovely!

They look great in a hallway... as is evidenced by this photo...

And here, the card catalog brings a "cool factor" to this otherwise traditional kitchen...

Here, a smaller natural wood finished card catalog serves as small buffet tucked into a corner of this simple dining room...

And it fits in quite well with a rustic / urban living room - aren't all those brass handles fabulous??

And while it clearly works well in urban spaces, it works equally as well in a country-chic bedroom...

A quick Craigslist search just now proved that these are not easy to come by.  Not a single listing matched what I was looking for...

Wouldn't it be kind of cool to try to mimic the look of one of these cool card catalogs on a double-doored cabinet, using small drawer front facades, and loads of brass pulls?

Ooh, I'm having some good ideas!!!

Wednesday, May 29, 2013

Hot Pink Lipstick

I'm a total creature of habit, and always steer towards the same look - big doe eyes with neutral / brown shadow, big black lashes, and pale lips -  but recently, I've been getting a little more experimental with my makeup routine.


I'd been doing red lips all winter, and was absolutely loving it, and while I was at the drugstore last week, picked up a tube of shocking pink lipstick.


The color is called rose hips, although to me it's a much brighter pink than any flower I've ever seen.  Depending on the application, it ranges from magenta (lighter application), to almost neon (two thick coats, blotted).

With lips verging on day-glo, keep the eye make-up light - neutral shadow, and mascara only!


Here's a close up of my lips from Saturday night... is that a shocking pink, or what?!


Let me just say, there is nothing more awkward then trying to get a close-up of your mouth... who knew how weird my nostrils looked up-close!

Nostrils aside, the hot pink is a fun, more summery variation from red, and I'm loving it!  What do you think?  Would you ever dare to wear hot pink lipstick?

Tuesday, May 28, 2013

Cabo Packing List: Inspiration to Reality

Yesterday I posted the inspiration behind my Cabo packing list, and here is a little glimpse of how that inspiration is translating...

Lots of bright colors and fun jewelry... aye-aye-ayeeeee!!


One more day and I'll be beachside... HOWEVER, I've got a few fun posts lined up for the rest of the week!

I'll be back on Monday, relaxed, refreshed, and hopefully not burned like a lobster!

Adios!
xoxo

Monday, May 27, 2013

Cabo Must Have's

In less than 72 hours, I'll be laying in my beach chair, sipping an icy margarita, and listening to the waves crash on the beach in Cabo.

A few girlfriends and myself booked a quick trip to Cabo for a quick escape from city life.  I plan to come back very tan, and very relaxed, but today and tomorrow is all about packing my bags for our trip south of the border. When I think mexico, I think beachy hair, bikinis, and bright colors, and this list covers my essentials for this little getaway...
Cabo

Cabo by beckyc1923 featuring a fuchsia dress

Sass & Bide multicolor dress, $380 / Victoria's Secret victoria secret / Colorful maxi dress / Fuchsia dress / Victoria's Secret victoria secret / Jimmy Choo strap high heels / Sigerson Morrison heel wedge / Nine West heels / Sam & Libby shoes / Michael Kors tote bag / BaubleBar orange bib necklace / H&M plastic bracelet, $4.51 / Rachel Zoe


Possibly the most essential item to pack on a tropical vacation is your swimsuit.  I'll be spending about 70% of my day in one, and I'm all about the bandeau style bikini.  It's especially great for the first few days to avoid tan-lines from a triangle top.  I also could not leave without a big floppy hat - the sun is STRONG and we want to avoid wrinkles at all costs.

I love everything about a maxi dress, and I plan on bringing a few - they are so pretty blowing in the breeze, and they are equally comfy as they are feminine.  They are usually not super tight around the mid-section which means, bring on the tacos!  I won't be holding back!  I'm all about the aztec prints out in stores right now, and these are so perfect for a trip to Baja.  I love the blouse-y short number almost as much as I love the black white and yellow bandage dress!

Comfy footwear is important too - especially with cobblestone pathways, and sand everywhere. I'll most likely spend most of my time in a comfy pair of gladiators, but it's nice to have a few sassy options for a night out on the town - bright striped espadrilles, brown laser cut wedges, and these yellow Jimmy Choo's are on my dream wish list for sure.  How amazing are they???

Accessories make an outfit, so I plan on packing a few bold statement necklaces and fun bracelets, and I wouldn't dare go on a beach vacation without a big sturdy tote to drag all my magazines, and sunscreen to the pool.

Just making this list made me sooo excited!  Off to pack!

xo

Saturday, May 25, 2013

Our new Upholstered Headboard

I gave you all a sneak peek of our new headboard last week, but yesterday afternoon, it finally made it's debut in our bedroom!


It took a lot of hard work, and a FULL weekend of sawing, sanding, measuring, drilling, screwing, gluing, upholstering, stapling, over-analyzing, band-aiding, nailing, un-nailing, re-nailing, and perhaps a little cursing somewhere in the middle, but it's finished, and while it almost ended up face down in the middle of the freeway (another story for another day), it's finally in our bedroom, safe and sound at last!

Literally blood, sweat (no tears), and a little stain remover went into this headboard, and I could not be more thrilled with how it turned out.  I am SO PROUD to say that with A LOT of help from my parents, I successfully made my own headboard!

We joked the entire time that the "A-Team" was working on it, and that the "A" stood for "type-A".  It's genetic I swear - we are all just as anal-retentive as one another... so that's probably why it took us two full days instead of one.  It had to be JUST PERFECT - down to the stained (and lacquered) legs that no one will ever see behind the bed.

The full tutorial on what you need, and what we did is on it's way, but in the meantime, here is a full photo dump of my pretty headboard in all it's glory!


After living in this apartment for over a year and a half, this room is FINALLY a room that we want to spend time in.  Up until recently, it had been a catch-all for rejected furniture that didn't belong in the rest of the house.  Slowly but surely, I've been making small updates to the room... making some chevron curtains, painting my furniture, replacing the dinky lamps that were there before, getting a new bed, new rug, new bedding... and the headboard is the final piece to tying this room together.

Do you even remember how this room started out??  Let me refresh your memory...


Scary!

I think I'll also do a post on "the evolution of our bedroom" since it has gone through quite a few changes.  Anyway, getting back to our headboard...

The headboard really anchors the room, and makes the bed the focal point in the space.  While our bedroom gets less light than any other room in our house, I think we finally got it right with the light bedding and pretty blue accents.  Late morning is my favorite time of day in this room - it gets direct light, and feels bright and airy for a few hours before the sun moves beyond these windows.

The mirrors I hung behind the nightstands help reflect light for the rest of the day, and open up the space.

Let's get a close-up of this fabric!


From a distance, you can't see the texture, but it is one of my favorite things about the headboard.  I am usually a VERY indecisive person, but when choosing this fabric, it took me maybe 5 minutes to make up my mind on it.  The nubby texture is my favorite part... and I feel that it has the perfect mixture of tan and grey together, so wall color and bedding will never be an issue.

I started out comparing solid colored linen fabric swatches, but my concern was that if I ever picked out a bedding in a similar neutral tone that it would look like I tried (unsuccessfully) to match the fabrics, but with this texture, there is no risk of that.  I toyed with the idea of white or creme fabric, but if I ever wanted creme colored bedding and had a white headboard, or white bedding but had a creme colored headboard, it wouldn't look right either.

So long story short, the fabric was an easy choice, and I am so in love with it!


I'll also talk about this more in the DIY tutorial, but we went with a nailhead trim - it's actually a strip of connected nail-heads  where you nail in every 5th nail or so.  This made it WAY easier to keep our lines straight, nail-heads evenly spaced, and after going through the process, I can't even IMAGINE tacking in individual nail-heads.  What a nightmare that would have been!


This shot is facing the hallway that connects our bedroom (and bathroom) to the dining room, kitchen, and living room.  It's a bit washed out due to the exposure (I swear, I am going to learn how to take better photos!) but you can KIND OF see the roman shade I made last year.


And as if the universe knew my headboard would be done, it's peony season!  And is there anything better than a big bunch of ruffled pink peonies??


I think not!


I think that this is hands down, my best DIY to date!


What do you think?  Do you love it as much as I do?

Thursday, May 23, 2013

Our Gallery Wall is up - TA-DAAAA!

I finally installed a gallery wall in our living room after 6 months of talking about it.  

I had agonized over every little detail for way too long... the layout of our future gallery wall, frame size, frame color, and about what would go in the frames... finally I'd had enough of talking about it.  It was time for action.  

And so one evening about a month ago, I picked up my hammer and some nails, and went to town... about 15 minutes later, we had a gallery wall.


Almost none of the original frames I'd bought for this project even made it up on the wall.  I'd been thinking black frames across the board, but after buying a few non-black frames, decided to flip this gallery wall on it's head, and spray them all gold.  Rustoleum spray paint to the rescue!

Once the frames were all sprayed and dry, I hung the large vintage print of the sailboat first.  With the largest piece of the puzzle complete it was easy to see where the other frames needed to go, and so I just started nailing up frames around it...


The gallery wall actually needs a few tweaks - in my preview post (the grainy cell phone shot of this wall after I finished it) I mentioned that the left side needed to be evened out.  I've started on that process slowly - replacing the illustrated Paris and London prints with brighter abstract prints that coordinate eerily well with the La Baule sailboat piece.  The left side still needs something else, to make it feel "even" but we're getting there slowly.  Maybe a few more smaller frames will do the trick...

This was how it started...


Not bad by any means, but you can really see how the abstract prints bring some much needed life to the space, and help tie things together...


Kris' least favorite game in the world is the "do you notice anything different" game when he comes home.  His first response is usually... your hair looks really good... is that it?  Did you get your hair done??

A well trained man... but this time, he noticed the gallery wall first.

This wall was VERY blah for a long time with three undersized black and white prints from Ikea - one in a broken frame.  Classy.  Remember how it looked before?


Don't be fooled... this is actually a REALLY good picture of how it looked before.

Here's a better "before":


This makes me realize and really appreciate how far this room has come since we first moved in...

I like that this space has a lot more character, and that there is a lot of color going on.  As much as I admire Restoration Hardware's style, I could never live in a room devoid of color and pattern that way.  I love pieces from their collections, but all tan and white and grey and greige (grey / beige) is not my jam.

Color makes me happy, and so this gallery wall is making me REAL happy.


Another thing I really want to point out here... the blue pillows with the white stitching.  These were a little DIY I did a few months ago.

Do you know where I got the fabric?

Target - the happiest place on earth (next to Disneyland)  The fabric was actually a shower curtain in another life.  That $19.99 shower curtain is now two throw pillow covers in our living room.  And I made them!  Holla!

A little stitch witchery (iron on bonding), and presto-chango.  We've got a pair of inexpensive, vibrant pillow cases, that are summery and fun... and match PERFECTLY with the water in the print (that was totally unintentional since the pillows happened way before the print was hung).


And so that's that... slow changes over time, mean big changes in the end.  I am really happy about my little gallery wall!

Wednesday, May 22, 2013

Grilled Peach Summer Salad

So... how amazing does this look???

Ahhhmaaaayyyyzzzziinnngggggg!

Grilled peaches?  I say yes please to that smoky caramelized flavor!  I came upon this recipe on the blog Feasting at Home, and it's officially been added into the queue for summer recipes.  Let's be honest... nothing says "summer" better than a perfectly sweet, juicy peach.

Here's a little tip to help you find the best peaches... pick out your fruit by smell.  This is actually how you should pick out all stone fruit - apricots, peaches, nectarines (by the way, this salad would be fantastic with nectarines as well) - these fruits taste the way they smell, so if there is little smell to the peach, it won't taste like much at all.

For this salad, here's what you need...

Salad:
   - Peaches
   - Goat Cheese
   - Basil (she uses purple basil)
   - Arugula
   - Nasturtium petals (to be fancy of course)

Dressing:
   - Balsamic vinegar
   - Olive oil
   - Salt
   - Pepper
   - Agave


The directions are painfully simple, although some of the ingredients might be harder to come by.  The original recipe used white balsamic vinegar in the dressing, but I'm sure regular balsamic would be great.  Nasturtium petals are not going to make or break this dish, but if you have them on hand, or you're really trying to impress company, track those bad boys down!

Ok, so cut the peaches in half, and take out the pits.  Coat in olive oil, and put in the grill for for about 5 minutes, juicy side down.


While those grill away, mix up the dressing, whisking all the ingredients in a large bowl.  Toss in the arugula and basil, and coat the leaves evenly.  Arrange on a flat platter for a pretty presentation.

Take the peaches off the grill and cut into thin slices.  Arrange on top of the greens, and finish off the salad with the flower petals.  The picture below also includes watercress and toasted almond slices... get creative! It's your salad!


For a heartier version, I'd add grilled chicken - avocado would also be yummy in here too.  Unfortunately for me, we have zero outdoor space, so we won't be able to use a grill with a flame, but an indoor grill would work just as well.

I'm hungry just thinking about it!

Tuesday, May 21, 2013

Vertical Gardens

My newest obsession has nothing to do with interior decor, but with exterior decor... specifically in the garden. And specifically addressing the issue of how to dress up an outside space that is short on... well... space.

The vertical garden maximizes what space you DO have... so if you don't have space to plant in the ground, utilize the side of your house, or a wall on a small porch, deck or other mini-outdoor area.  Right now, we don't technically have an outdoor area (unless you count the fire escape), but that may change soon enough... so when we do, I want to be prepared with ideas!

I mean how AMAZING is this??  Here is an up-cycled a pallet from a local garden store stuffed full of all kinds of succulents... LOVE!

Or this larger scale succulent wall against the bright orange-y red aluminum siding...

Here, it's almost like a piece of art in a zen indoor-outdoor space with lots of natural light.

And here the vertical garden is applied inside, and is lush with ferns that take over this entire wall behind the mod sofa.

I really love the rustic look of this one... In my head it seems like it would be easy maintenance but god knows I have a brown thumb that can kill any living plant within the week...


What do you think of the vertical garden?  Any experience building one yourself?  Is it easy? Hard? Should I try it out or stick to potted plants?

Monday, May 20, 2013

Bedroom Updates

Happy Monday!  Hope you all had a relaxing weekend!

I've been a busy bee, working on a few things for our bedroom.  There are some bedroom updates coming  soon enough, but in the meantime, here's a little sneak peak of a) how I spent my weekend, and b) what is on it's way into our bedroom this week...


It's obvious enough to me, but are there any guesses??

Ahh, that fabric just makes my heart flutter...

Friday, May 17, 2013

Grey and White Palette

My best friend has decided - OFFICIALLY - to move to Chicago, and while I need to come to terms with it... I think I'll stay in denial for a while longer...

Possibly the only good thing that will come out of her moving half-way across the country from me, is that I get to help her decorate her new place.  

She recently mentioned that she's been loving two things - chevron, and a grey and white palate - so I put together a few inspiration boards of how I envision her future Chicago living space...  It's been a good long while since I've put together an inspiration board, and it feels good to be back in the game - creative juices flowing, and all!


She has the white Ektorp sofa from Ikea already, so I built everything based on the fact that she'll likely be moving this with her.  She has always been fond of the shabby chic look and feel, but has been coming around to more contemporary styles (my personal favorite).  

Keeping the feminine feel of the shabby chic with a light color palate, I'd say this inspiration board is contemporary meets feminine... You know I love a good graphic trellis pattern, and this rug is perfection.  This rug is on sale right now too!! $222 on sale at RugsUSA (50% off)... go get it!

The bold striped curtains are really fun, and could be easily swapped out for a solid white during the summer.  Even though both the curtains and the rug make a statement, the soft grey doesn't distract, and the fun pillows and art bring in color.  

I've been wanting a ginger jar lamp for the longest time, and these pale blue beauties seemed fitting to balance the pops of pink...

My second inspiration board takes girly to the extreme.  I kept details from the first inspiration, but incorporated more bold sweeps of blush (those curtains are not "pink").  This is an apartment that CLEARLY belongs to a girly girl, but I think it's still sophisticated, and adult.  Nothing about this says "little girls room".

To balance out all the pink, I swapped in a bolder rug in dark grey chevron, and kept the lighting a little more quirky with a masculine brass reading lamp, and a fun ceramic owl lamp.

I LOVED the mint linen pillow, and the peach ikat is just fun.  During the winter months, it would be so easy to swap out the art for something black and white and moody, do switch out the peach pillows for faux fur.  Bring in some dark red (or snow white flowers), and do a cool Lucite tray on the table, and this room goes from summer to winter in a snap.

See what I mean??


So as fun as that was... I still think she should stay.  Chicago is sounding VERY far all of a sudden...