Monday, July 29, 2013

Orchid Terrarium

Our living room was feeling a bit... cluttered - I have a shamefully bad habit of adding more and more accessories to our space without taking things away.  I feel like a decor pack-rat sometimes.  

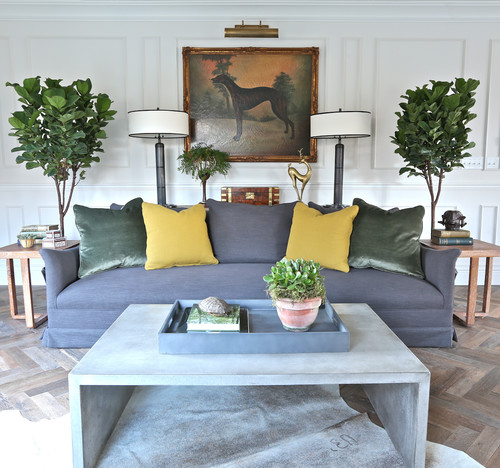
The side tables in our living room were in need of simplification - the multiple picture frames, candles, books, vases, etc were too cluttered.  It all had to go.  What to put in their place?  Something simple, clean and pretty.... and what could be more simple or more pretty than an orchid??


I've always loved the look of a pretty terrarium, but do not have the expertise to know how to successfully plant one.   

Despite my brown thumb, I thought I might try my hand at a more simple version of a terrarium - I had a pretty glass apothecary jar, and it was crying out to be used, so on Saturday morning, I took a quick trip to the grocery store to pick up some breakfast goodies, and came home with a few small orchids.  

Bear with me as I scientifically explain how I created an orchid terrarium...


Step I: Take orchid plant out of it's pot as carefully as you can

Step II: dump into apothecary jar

Step III: Admire pretty new "terrarium"


I know, you were hoping for something more special than that, but it was really that simple.

I'm going to get additional soil since there was not much in the pot, and I feel it needs a bit more now that it's spread out over a larger surface area.  See how the roots look like they need a little more soil coverage? A quick trip to a nursery will fix that!


With the light near our windows, and the slightly mottled glass, this was VERY hard to photograph, but trust me when I say it's SO pretty!


If you think about it, an apothocary jar (or cloche) is kind of the perfect environment for an orchid - they love lush, humid environments, and the lid on the apothecary jar keeps things nice and humid... it looks so pretty in our living room, but if this orchid ends up dying in a few weeks, it will still be totally worth it! It was only $7!!


Hope you had a great weekend!!
xo

Wednesday, July 24, 2013

Rustic Bookshelves

Sorry for the lag time on the dining-room-turned-office update photos... that room has not gotten any of the other promised updates since I posted about my beloved fiddle leaf fig (which by the way, is absolutely THRIVING so far knock-on-wood).

The original plan was to hang shelves for book storage on the walls flanking the entrance to the living room... three on the left wall, and two on the right wall so there would be room underneath for a nice comfy chair to read in... here's how we I envisioned it working out...

Since painting, and rearranging some of the furniture, I hung one of the shelves, but after getting it up, I wasn't convinced that I LOVED it... so I waited a week to see if I wanted to hang the rest, or if I wanted to switch up the plan.

The good news is, I do like it, so I want to hang the rest of the shelves...

The bad news is, I do not trust our plaster walls to support a heavy load.  After hanging the first one, I'm having visions of these shelves coming crashing down in the middle of the night after the plaster crumbles from the weight of our books... no bueno.

I wanted these shelves to function as a bookshelf, but I just don't see that happening now... I am so sick of staring at the cardboard boxes in our living room full of the books that used to be in the dining room (not a good look by the way) so I want to find somewhere to store them... stat.

What I need is a bookshelf... a small, pretty, but functional bookshelf, that can go along this wall in our living room...

Let's pretend that this photo wasn't taken right after I dumped all my treasures from Ikea, and that it's not a complete mess... sadly the console table still looks like that - books galore.

I plan to sell that console table (which really is a shame since I love it even more after painting it white recently (remember when it was blue and in our hallway??) It's come a long way since then...

Anyway, back to the bookshelf for this space.  I want it to be about four feet wide, and about three feet tall, and I really want something with an aged wood look...


Something like the Copenhagen Bookshelf from West Elm would be perfect... if it weren't like 7 feet tall. Simple clean lines, and that gorgeous wood... if only it had a little brother bookshelf!  Back to the drawing board...


The Emerson Bookshelf from World Market is also along the lines of what I'm looking for... although again, too dang tall!  Sooo frustrating!

But then... hello... what do we have here??

Overstock to the rescue?  This one is actually a TV stand, but it could actually work!!

It's 2.5 feet high, by almost exactly 4 feet long... I'm not loving the turned detail on the metal legs... I wish they were a bit more simple, and a few bad reviews always get me nervous, but this could be a serious contender...

I need to make a few more measurements to see if this size will fit, and do a bit more digging of course to be sure this will work in our living room...

What do we think?

Tuesday, July 23, 2013

Creating (a stylish) Living Space in a Studio

My old coworker (and fabulous friend) Margot just moved into a Studio (after living in a truly awful situation with roommates for a few years).  One of the BEST things about living alone is being able to make decisions on your own about what YOU want in your space.  You don't need to take other's tastes into consideration, and most importantly, you don't have to worry about your sloppy roommates ruining your new pretty things.

Amen to that!

Well, Margot already has a few things in place, but I was able to help her out a bit, by creating a few mood boards for how I see her studio coming together.  She has white bedding, neutral walls, and this fabulous, bold, cobalt sofa from Ikea.  With that in mind, I pulled together a few fun accessories, to create several ideas of how I see this space coming together.


This first inspiration board was a fan favorite.  This rug (at the time, 75% off from RugsUSA) is the spitting image of the Souk wool rug from West Elm that retails for ~$6x the cost of the Marrakesh Shag rug we found at RugsUSA...

So... you could have this one for $899 (8x10)...


Or... you could pay $187 for it's long lost twin (8x10)...

No brainer right??

Margot really liked the idea of yellow being the accent color in the room as well, so I added in a few cool ikat throw pillows that incorporated a burst of sunshine-y yellow... but then we saw a few yellow and white rugs on sale as well, and it got us thinking...

There was a creme colored rug with an Indian inspired yellow and grey pattern, and then the yellow and white chevron piqued her interest too...


We also tested out a few grey and white options as well...


But we just kept coming back to this beauty...


We figured that the neutral colors would translate into any space - so if she moves, or wants to switch up the accessories, she won't forever be trying to coordinate with a yellow rug, and the shaggy texture is just enough "boho" to be cool, without being sloppy.

We both agreed that in a small space where there is bold color in the sofa, it was important to keep the rug a neutral color with a bold pattern to keep your eyes from feeling "confused" when trying to make sense of the space.

These rugs have been getting lots of attention - just look how fabulous they look in these spaces...


Of course, West Elm's blog has fabulous photos of this rug...


But it's also a favorite of designer (and personal idol) Emily Henderson... she used it in her friend's living room re-design, with lots of pops of color (god, I hate myself for using that phrase)


And clearly, she loved it enough to use it again in her own home... this space is so light and bright, and colorful, and pretty, and crazy all at once, but I adore it.

Amazing right???

Ok... fine... a few more glamour shots from Emily's place... seriously, it makes me drool...

THOSE CHAIRS!!  What I would do for them to be mine...


So are you sold?  I WISH I had a need for this rug... Kris would probably kill me if I brought ANOTHER new rug home... but it makes me happy to know that Margot's space is coming along!

The rug should be arriving any day now...

Friday, July 19, 2013

Happy Weekend

Happy Friday!  I'm checking out for the weekend since I'll be here...


Go on... feel a little jealous...

I'll be in Tahoe for one of my best friend's bachelorette parties - going boating on the lake, soaking up lots of sun (and margaritas) and celebrating the impending end of her "single" life...

Happy Weekend!
xo

Thursday, July 18, 2013

Easy DIY: Upcycled Wine Bottles

How cute / cool does this upcycled wine bottle turned vase look??


My cousin posted this picture on Facebook, and it got me thinking... I've been focused on larger projects recently, but there is something so satisfying about the little DIY projects that you can tackle in a night after work... case in point - this wine bottle made over with a little paint and twine

#instantgratification

Clearly clever women run in my family... or is it that Pinterest-lovers run in my family... or is it that expert wine-drinkers run in my family??? Or is it all of the above??  Eh, that's neither here nor there.

I happen to be QUITE the expert wine drinker, so this is the perfect project for me... in a week's time I could have enough bottles emptied and ready to open an Etsy shop!  I kid... kind of.

I took to Pinterest for more bottle inspiration, and these wine bottles doused in chalkboard paint caught my fancy.... they'd make for a cute little centerpiece at a party (or better yet... mask a cheapish bottle of wine if you're hosting a big family style dinner)...

Not to get completely distracted, but a few of my favorite bottles of inexpensive red is the Menage e Trois Meritage blend (usually around $8 at the supermarket) and the Ravenswood Old Vine Zinfindel (also around $8 most of the time)... you are welcome in advance!

Source

And how cute is this one... much more "wedding-y" and a little more rustic since they actually used chalk on it, instead of a chalk pen like the above photo...
Source

Or white - I'm loving the black bottles much more, but a group of these (in varying sizes and shapes) in white could look kind of rad on a mantle...
Source

Like I need an excuse to pop open a bottle of wine... but if I were looking for one, I'd say these are a pretty good reason!

Wednesday, July 17, 2013

50 Shades of Grey... Literally

Let's talk about paint colors... shall we?

Let me start this off by admitting that I had no idea how hard it would be to pick a shade of grey.  I mean, I thought I was going to be all clever with the title of this post, but I literally ended up evaluating just about 50 shades of grey... and that was after I had narrowed it down!!

I wanted something light and bright - no yellow undertones, but not too "cool" of a color either.  Just a perfect, clean, true grey.  To cut to the chase, I ended up with Grey Owl, by Benjamin Moore, but ending up with this decision was NOT an easy one...

Here's where I started...

Yeah... lots of options... too many options...

Here's where I narrowed it down to...


I decided to do a little Google image search, and found a few that I loved.  Sleigh Bells had been a front runner from the paint chip, but in the pictures it looked really steely and well... silvery.  Just. Like. A. Sligh Bell.  Duh.

Coventry Grey really appealed to me as well, but it looked a bit darker than I'd been thinking, and since the dining room doesn't get a TON of natural light, it would have been a bit too risky...


Smoke Embers and Nimbus were a little on the "beige" side of the spectrum, and so I was really looking at White Whisp and Grey Owl.

White whisp was too white, and I really wanted the freshly painted trim to pop, so I ended up choosing Grey Owl.  As if it were fate, just before heading out for my paint, I read a blog post by Emily Henderson of Style by Emily Henderson, where she mentioned that Grey Owl is her go-to grey paint.


Sooo... I would pretty much follow Miss Henderson off a cliff (if you have not read her blog, DO - she is my hero and I love LOOVVVEEEE everything she designs), and so I took it as a sign that "Grey Owl" was the one for me.  For easy reference at Benjamin Moore, it can be found on paint chip 2137.

Here's how it looks after two coats of fresh paint - I had them mix up primer and paint in one, and two coats covered beautifully.


It's light enough that it doesn't make this small room feel smaller, and it doesn't make it feel gloomy, even on foggy days (which we've had an abundance of since I painted the walls).

The trim still pops, and the color doesn't feel disjointed from the rest of the apartment (which does not have another "colored" wall in it).  I am SO HAPPY with Grey Owl - I would paint every wall in our house this color, if I had the energy in me...

This is a great before picture - I don't have a ton of pictures of this room, just because it's so dang small and hard to photograph.  Even though the walls have been painted, you can see that the layout was just not working (and we've lived with this layout for almost two years! Dah!)

The rug is WAY TOO SMALL for the room, the table blocks the pass-through from the living room to the hall... it just had to change.  But look at that paint... one step closer!!

More updates to come... stay tuned....

Tuesday, July 16, 2013

I Have a Dream... of a Fiddle Leaf Fig

Here's a riddle for you... what is alive (but doesn't move on it's own), has gorgeous green waxy leaves, is ridiculously expensive and favored by every contemporary interior designer who ever lived???

If you guessed the fiddle leaf fig, then you'd be correct!

I mean look how pretty they are!!


Enough with the inspiration photos you say??  You totally get how amazingly gorgeous these plants are???  And you understand why I am completely obsessed with them????  And you are wondering where I am going with this?????

Well, ok.  Let me tell you my little fiddle leaf fig story...

I've wanted one of these graphic, big-leafed beauties for going on three years now, but I have discovered that they are pricey.  REALLY pricey in fact.  A 5' fiddle leaf fig can easily run four-hundred plus dollars... I know... I KNOW... that is ridiculously expensive!!  I have a notoriously brown thumb, so I was not about to shell out several hundred bucks for a plant that I would be likely to kill in record time.

I had heard rumors that Ikea was known to sell these plants, but I'd stalked the Ikea plant section for years without seeing so much as a bit of evidence to show that the fiddle leaf fig was ever actually sold there... I was convinced that this was a total urban myth... or was it???

Fast forward to this past weekend while I wandered the aisles of Ikea, dodging every idiot and their huge cart picking up shelves, brackets, and some of their lovely Ribba square frames... when lo and behold, what did I see??

You got it - a lovely, lonely, (smallish) fiddle leaf fig, nestled among the cheap-y palm fronds and money trees (not to hate on the money tree... I actually kind of like them).  As the Ikea patrons were examining the medium sized palm plants, I deserted my cart, and dashed over to the lone fiddle leaf fig, possibly trampling a few small children on my way.  Um, it was the holy grail - and for $12.99

HOLLAAAAAAAA!!!

Here she is -

Go on... just look at those lush pretty leaves...


And let's not forget about the basket I found to house it!!  It does NOT look like it came from Ikea.  It's big and sturdy, but it was still under $30!!  And that's not it (I feel like an infomercial)... it also has a plastic insert to catch any water that leaks out from watering - keeping your floors dry, and preventing any rot in the pretty basket. It doesn't get better than that folks.

Plus, look at the nice handles and black detail around the rim - House Beautiful has started to feature decorating advice from the experts in every issue, and last month one of them was "always be sure to include black in every room - it grounds the space".  Thanks House Beautiful!  Don't mind if I do!


And a final "beauty shot" of my little fiddle leaf fig... the mirror reflects the rest of the room, so you can kind of see how the rest of the space is evolving in this last photo...


Now I just need to figure out how to keep this little plant alive, and then I can call it a success!!

Monday, July 15, 2013

Dining Room Progress...

Happy Monday all!  Last week, I'd talked about how I'd painted the trim in our dining room, and that from there my plans for this little space spiraled a bit out of control...

We'll let's take a look at a few before's and afters from just the trim...

BEFORE:


AFTER:


Nothing earth shattering, but a DEFINITE improvement.  The trim and the ceiling had been the same color, so that really puts into context how much brighter the room felt once the trim got painted out.  Queue: sigh of relief.

This weekend, I made some SERIOUS headway on the other updates I'd wanted to make... remember this inspiration board I put together??


Well, I am VERY excited to say that the dining room is looking VERY close to this already - dare I say it, I will be finishing up our newly revamped space this week.  I'm going to hold out for a final room reveal, but I wanted to at least share a few sneak peeks at how it's evolving...


Ooh la la... look at those pale grey walls staring back at me....  and with the white trim...  I die.


.... and what is this??  A nubby, natural, gloriously textured jute rug??  Love at first sight....


Yes.  Yes I did.  Please say hi to my new BFF - she is soft and a very pale blonde, and I absolutely adore her!

This is just the smallest glimpse of the changes this room is seeing... I cannot wait to show you all the rest of the progress later this week!

Have a happy Monday
xo