So our kitchen got a bit of a makeover recently!! Actually, "a bit of a makeover" is an understatement. The tile counter-tops got a total face-lift thanks to some industrial strength grout paint. This whole space is feeling dramatically different than it did when we moved in and I hardly spent a dime doing the updates.
I finally got around to snapping some pictures of all the progress I've made on our kitchen today, and cannot wait to share the before and after's with you! I'm calling this "Phase I" of our kitchen's makeover, and it's quite a dramatic transformation.
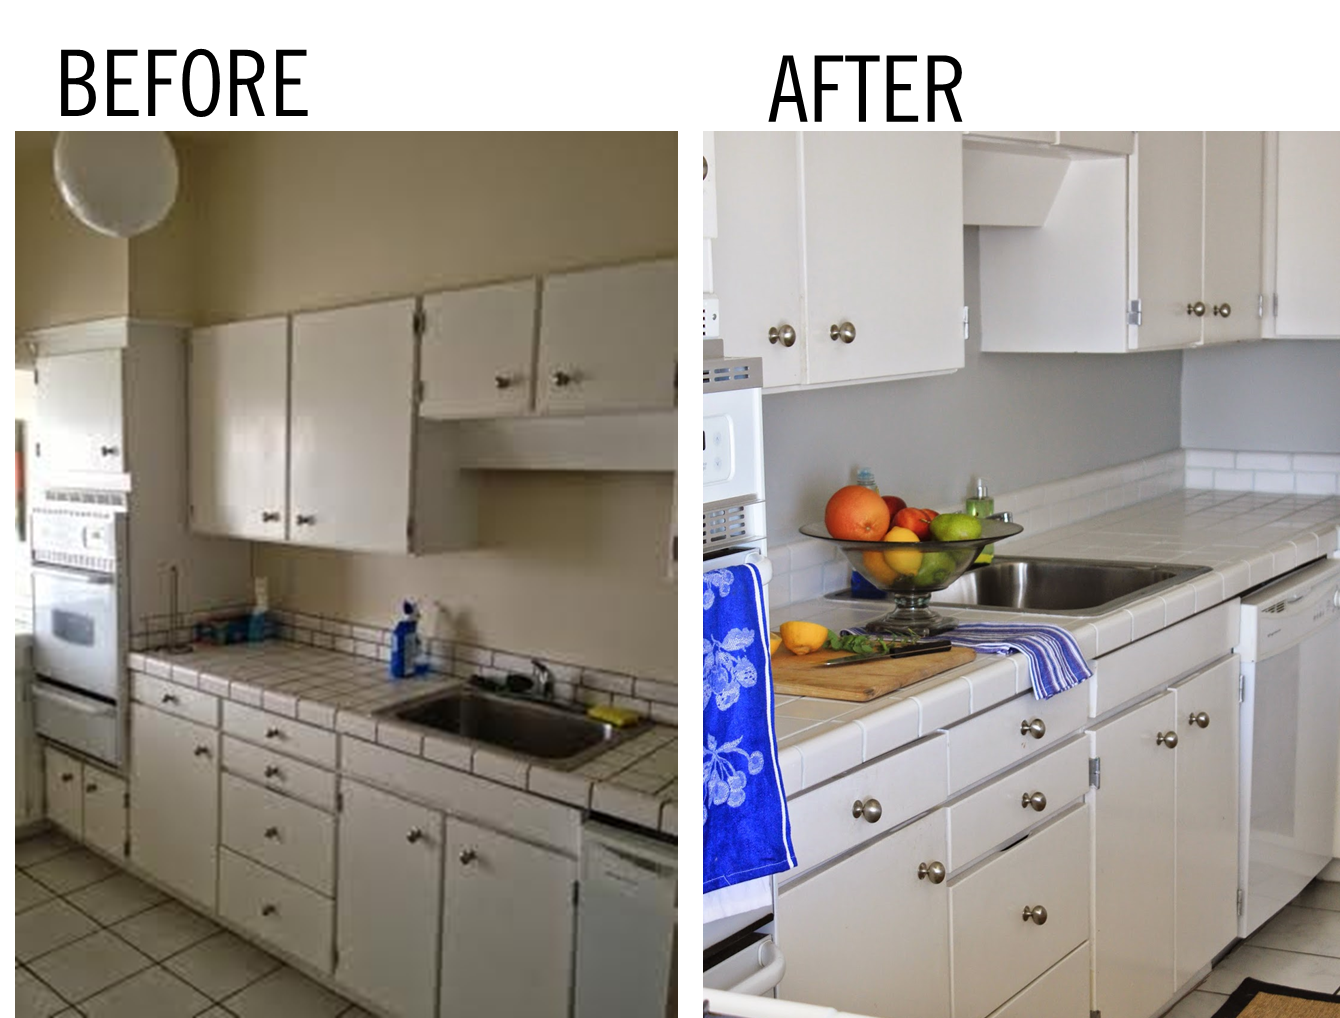
Here is what the kitchen looks like as of this afternoon:

Trust me when I say that this is a dramatic improvement from where we started!
It now feels bright and clean, and so much newer and modern than it did just a few weeks ago. All I did was paint. Paint on the walls, and paint on the grout. Sounds weird, but grout paint is a thing. I used a different brand for our shower a few months back, and while I was happy with those results at the time, I had no idea that there were better products out there.
After doing some research I discovered a product called Polyblend Grout Renew.

I'm telling you, this stuff is life changing. It has AMAZING reviews online, and two of my favorite bloggers from Young House Love, used it on the tile entryway of their new home. Apparently its holding up to foot traffic, so I knew I had a good shot using it on our counters. This particular brand of grout paint has a sealer built into it, so I wasn't as worried about doing a light color on the grout as I would have been otherwise.
Ok, so before I get into the process of how to apply the paint, and revamp old, disgusting grout to your heart's content, let's see a few "before" pics... shall we?
So this is what the kitchen counters looked like when we started the process...

Woof.
.jpg)
They were bad my friends. Like so bad, these pictures don't really do their grossness justice.
As you can see, the off-white tile had dark brown grout. Not an attractive combination.
The walls and back-splash were all yellowed out paint that only made said grout / tile look even worse. Everything about the combination of the paint and dark grout made the kitchen feel dirty and dated - very 80's, and not in a cute Cindy-Lauper-teased-hair-Breakfast-Club kind of way.
Before you can start painting the grout, first you have to clean it, and I'm not talking about wiping it down with a Clorox Disinfecting Wipe. You need to get Sulfamic Acid Cleaner. What is this, you ask? It's a very smelly, apparently toxic, cleaning agent that will lift YEARS of grime from your grout. I found this out first hand.
As a heads up, this is not a job you can knock out in one night - the cleaning took me several hours at least, and then you have to let the grout dry really well before painting, or the grout paint won't adhere.
Let's start by talking about the cleaning process... The container had good instructions on how to mix it up, but not much about what to do after, and I wasn't able to find much online, so here's what worked for me:
Wear gloves - don't try to do this without them. I also wore safety goggles because this stuff seemed pretty toxic and I value my vision. Once you're all suited up, get your grout wet with water so it will absorb the cleaner evenly. Then mix the Sulfamic Acid per the instructions on the container, and apply to counters with a sponge you will never use again. After applying it to the counters, everything happens pretty quickly. After a few minutes you'll notice things getting a little gummy. That's grease. And grime. And unidentifable grossness that has built up over time. This is supposed to happen. Let it. Once it's really gumming up, start scrubbing. I used a plastic bristle brush and it worked beautifully. Once the gummyness comes up, rinse with clean water. It's going to take a lot of water, and much more scrubbing, because the grease smears around. It doesn't just lift off like you think it will. It's all super fun (insert sarcasm here) but once its clean, you'll notice a difference. A HUGE difference. Your grout will literally be restored to its original color. Prepare yourself to be shocked. I thought the grout in here was dark brown. It was actually light brown - equally unattractive, and really really gross to think about.
Anyway, once the grout is clean, let it dry out - overnight at least - and then get to painting. Super simple. I used a stiff bristle toothbrush, and you just work the paint into the grout. It will get on the tile. You have two options - wipe it immediately, or let it dry and remove it later.
I started out doing option 1, and it was tedious. Especially since covering brown grout with white paint required two coats for full coverage (3 coats in some places). I found that it was easy enough to get off the tile after it was all dried. I actually let it cure for a few days, then got the counters wet, and the paint on the tiles literally rubbed off with a finger / paper towel. Soooo much easier than wiping as you go, but do what feels right.
Anyhoo, that's the whole process! I'm not going to lie, it was a bit back-breaking to lean over the counters, but I put on some good music, and spaced out. It's pretty mindless and easy except for the leaning over part, but it was 100% worth the outcome! Our kitchen feels brand new to me and so much fresher. In total, it took me about 3 nights to finish - one night to clean, one night to paint, and one night to clean the paint off the tiles where it went out of bounds.
Here are some more pictures of our kitchen counters after their facelift:


Love!! It's LOVE!! After the counters were looking all clean and new, I decided the walls and back-splash needed some love too. Out came the paint, and a few hours later I was in a bright, clean grey and white haven.
The Polyblend Grout Renew Grout Paint comes in a bunch of different colors (and multiple shades of white), so I bought two and tested them out. I brought home the Antique White and the Snow White colors, because I didnt want the end result to look too white next to our off-white tile. The tiles started out looking really beige but it turned out that they were much more white than I originally thought. After testing both colors of grout paint, I ended up going with the Snow White (which is the whiter one).
As you can see, it's not jarring, and it looks really natural. In the end, our tile is actually pretty white, and it was just the yellowing walls and disgusting brown grout that made them look so beige. Who knew?!
Anyway, do you want to see a series of before and afters side by side to compare??
That's the best part of these posts...
Here we go!


And just becuase I knew you wouldn't be able to get enough of how fresh and lovely our kitchen is looking, I snapped a few more pics "just because"...
Here's how clean and pretty our sink is looking now...

Like a breath of fresh air I tell you!! I actually enjoy cooking in here now!!

These next two photographs were taken standing behind the stove (in my little desk / office area that I'd posted about here) looking back towards the dishwasher...


It's unfortunately not quite as dramatic in pictures as it is in person, but trust me when I say that a coat of paint on the walls, and grout paint on the counters have transformed this room from a gloomy, dated, grease-fest, to a bright, airy, food sanctuary.
It's night and day my friends.
Such an improvement! I am constantly amazed about your creativity AND ability to make tough projects seem easy. Great work!! xo
ReplyDeleteThanks girl!! This one really wasn't hard... just took A LOT of patience, which for me is hard :-)
DeleteWow, I'm sold. I was researching this topic and came upon your blog. I think I may try painting our grout after all. Thanks for all this great information
ReplyDeleteAbsolutely!! Good luck!
Deletereally great change. how much did the paint cost? where did you find it - in store or online?
ReplyDeleteThe project was CHEAP. I got the grout paint from Home Depot, and right next to it is the grout cleaner. All together both products were probably ~$20 (or less). And then the cost of two toothbrushes. I think you can also order both from online at Home Depot's site in case you live in a rural area!
DeleteCan I say "thank you" for this post? I found your blog after searching for Polyblend Grout Renew, and had been going back and forth about trying it in my kitchen. My counters look just like yours did before, and I hate them so much. It's not in the budget to do a kitchen reno, or even just replace the counters right now, but I didn't want them to look worse than they do now (is that possible?) Well I'm convinced. I'm not very handy, but it sounds like a job I could actually do myself while the kids nap. Thank you, thank you, thank you for this post. Very helpful.
ReplyDeleteIt's comments like yours that make writing on the blog, so enjoyable (and not just because I find it personally fulfilling and fun) - I just wish the post wasn't anonymous :-) This is a really simple project that costs next to nothing. If you're willing to put in the time, and a little elbow grease, it's definitely doable. Thanks so much for stopping by, and good luck! Keep me posted on how it goes, and of course, let me know if you have any other questions.
DeleteYou’ve made some great upgrades on the kitchen counter. Everything looks so neat and new! I think the grout tops it all, since it helped give a brighter atmosphere to the entire area. Anyway, I hope it still looks a great as it was when you first applied it. Thanks for sharing! Have a great day!
ReplyDeleteNathan Riley @ Steemer Atlanta
Hey Nathan - I'm happy to report that the grout has held up beautifully. It's been nearly a full year since I did the countertops and they look as good as the first day they were finished!!
DeleteThank you for posting this! I have the same hideous counter tiles and have next to $0 for a remodel. I plan on painting my cabinets so this is the only option I have for my counter. How does the grout hold up to spills and cleaning? I live with someone who constantly spills coffee and unfortunately never thinks to wipe it up.
ReplyDeleteIt is actually legitimate ad together with i may share with you. Interesting together with appealing which unfortunately people share with you thus i believe that so it is useful together with informed. I would really prefer that will thank you so much to your endeavors. My organization is tiredness similar perfect job with my family from now on in the process.
ReplyDeletedoes anyone know where to find this tile?
ReplyDeleteHi!
ReplyDeleteI hope you are still accepting comments. I think that these designs are great but you never get the full impact of the tile unless you physically touch it and see it live.
Tiles truly can dynamically change a room and working with a local supplier is your best option.
pave tile website
Awesome blog. I enjoyed reading your articles. This is truly a great read for me. I have bookmarked it and I am looking forward to reading new articles. Keep up the good work!
ReplyDeleteCeramic flooring
Whether you’ve just put in a new kitchen, going through a renovation or just want to add a new coat of paint, https://dupaint.com.au/ experienced team can help you!
ReplyDeleteConcrete paving maintenance cost over time, is far less expensive than asphalt paving. Best paving company
ReplyDeleteVery niϲe poѕt. I ϳust stumbled upon your weblog and wished to say that I have truly enjoyed surfing around your blog posts.
ReplyDeleteThank You and that i have a tremendous present: Where To Start House Remodeling house renovation financing
ReplyDelete